Exercise 12 – The Circuit: Take-Off and Climb to Downwind
TAKE-OFF AND CLIMB TO DOWNWIND: AIR EXERCISE
1. TAKE-OFF (INTO WIND)
- Checks, Look out, Listen out, ATC clearance
- Line-up – Straighten nose wheel, Use maximum distance
- Power – Full, smoothly, Keep straight, Ts & Ps
- Elevators neutral then slight back pressure to take weight off nose wheel
- Rotate at 50 kts, Select initial climb attitude
- At 67 kts – select normal climb
2. TAKE-OFF (CROSS-WIND)
- As above plus: Into wind aileron, weathercock effect
3. CLIMB TO DOWNWIND
- After Take-off Checks (feed in later)
- Drift allowance (for any crosswind)
- Position to turn crosswind, Lookout
- Level-off, accelerate to circuit IAS
- Position to turn downwind, Lookout
4. DOWNWIND
- Spacing, Tracking (drift allowance)
- Checks (feed in later)
- RT (feed in later)
5. ENGINE FAILURE AFTER TAKE-OFF
- Lower the nose to select glide attitude
- Select landing area (± 30° – Never turn back)
- Fly the approach (Flaps, S-turns)
- Secondary Considerations – Only if time permits: Crash Checks, RT
THE CIRCUIT: AMPLIFYING NOTES
TAKE-OFF AND CLIMB TO DOWNWIND; ENGINE FAILURE AFTER TAKE-OFF
GENERAL
- The circuit is a busy environment and your student has much to learn. Because of this, traditionally, the circuit has been considered as two distinct lessons. For ease of reference this guide follows that format (Exercise 12 – Take-off, Climb, to Downwind and engine failure after take-off; Exercise13 – Approach and Landing) even though, in practice, both exercises are covered in each planned circuit lesson.
- By the time of his first formal circuit lesson, your student should have learned all the basic flying skills necessary – indeed it is your responsibility to ensure that he has. Consequently, the emphasis in circuit lessons is applying those basic skills in the context of the traffic pattern. What’s more, your student should start practicing some elements before the first circuit lesson; e.g. as soon as he has
learned to fly straight and level he should fly some of the downwind leg during every recovery to land – do not fly any part of the circuit for your own satisfaction or “to save time” when your student is capable of doing it. - The appropriate points at which to introduce your student to the various parts of the circuit are covered below.
BEFORE FLIGHT
- Preparatory instruction
- Use of elevators, rudder and nose wheel steering
- Effect of crosswind
- Use of power
- Engine Failure
- Drills and circuit procedure
- Factors affecting length of ground run
- Airfield control and RT procedures
- The TEM aspects of wake turbulence during take-off and on the final approach to land
THREAT AND ERROR MANAGEMENT
1. Lookout/Listen Out
In the congested environment of the circuit, a good lookout is essential for safety, so you must demand a high standard from your student. In addition, teach him to listen to others’ RT calls to aid Situational Awareness which helps to locate other traffic.
2. Checks
You will have taught your student the Before and After Take-off Checks well before the first circuit lesson so he should be well practised and be able to complete them accurately by this stage; let him do so.
3. RT Procedure
Teach RT procedures progressively and, if necessary, do the RT for your student on the first lesson. Insist on correct phraseology and procedures, concise transmissions and on calls being made in the right places (early or late calls cause confusion). By first solo the student must be completely familiar with the circuit RT procedures and the action in the event of a radio failure.
4. Wake Turbulence
Discuss the hazards associated with wake turbulence and the separation recommended in the current regulations.
DURING FLIGHT
- Take-off into wind
As soon as your student can taxy competently and has learned Effects of Controls, start to teach the take-off. Do so progressively, first the initial part of the take-off, then the lift off (let him learn to use each control in turn, if necessary) and transition to the climb:
1. When cleared by ATC, line up on the centre-line (do not make “allowances” for offset seating) and ensure the nose wheel is straight before braking smoothly to a halt. Use no more runway than necessary to line up.
2. Release the toe brakes, and apply full power smoothly. Keep straight with nose wheel steering/rudder (looking well ahead), with the yoke held central. Check Ts and Ps and ASI briefly. Teach increasing steering/rudder effectiveness as IAS increases.
3. At 50 kts ease back on the yoke to select the lift-off attitude (nose on the horizon) and allow the aeroplane to fly off the runway. Stress the dangers of either hauling the aeroplane off the ground at low speed or holding it on the ground too long.
4. Maintain the lift–off attitude until approaching 65-70 kts, then select the normal climb attitude.
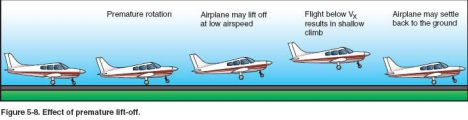
Note: Effect of premature lift-off
CROSSWIND TAKE-OFF
- The technique for crosswind take-off is the same as that for one into wind with the following additional considerations;
- Teach using into-wind aileron (substantial deflection initially, reducing to ailerons neutral for lift-off).
- Teach using rudder, as required, to counter any weathercock tendency on the runway.
CLIMB TO DOWNWIND
- If circuit departure procedures permit it, start to teach the climb after take-off procedures as soon as Exercise 7 is complete and allow the student to practice:
- Climb ahead to published altitude/height or point to turn crosswind. (Make allowance for drift, as required, to maintain extended centre-line – use of visual reference and DI; rudder for balance.)
- For a crosswind take-off, teach maintaining wings level as the aeroplane weathercocks immediately after lift-off. Allow aeroplane to weathercock naturally to allow for drift.
- Climbing turn onto crosswind. (Stress lookout outside as well as into the turn.) Roll out onto heading to allow for drift in order to fly a square pattern.
- Level off at circuit altitude and accelerate to pattern speed. (Re-emphasize Progressively Adjust Attitude, Trim and balance.)
TURN TO DOWNWIND
Teach:
- Position to turn (References relative to the airframe – applicable at any airport.)
- Medium level turns onto downwind (Stress lookout outside as well as into the turn.) Roll out to allow for drift in order to fly a square pattern.
DOWNWIND
- This is merely an application of straight and level at circuit altitude and speed which can be introduced during recovery from pre-circuit lessons.
Teach progressively;
- Correct Spacing (Using airframe references – applicable at any airport; appropriate heading to allow for drift.)
- Landing Checks (Do not introduce these before your student can fly the pattern reasonably accurately; complete checks from memory – stress the importance of completeness and accuracy.)
- RT (As with checks, introduce only when your student can fly the pattern competently.)
ENGINE FAILURE AFTER TAKE-OFF (EFATO)
- Regardless of local regulations (that may prohibit EFATO practices in the circuit), EFATOs are best taught away from the circuit, initially. Most of the skills required are learned when doing glide approaches, so do not try to teach EFATOs until your student has practiced some of these. Stress that the aim of the EFATO procedure is to save life, not the aeroplane, and that any real EFATO you can walk away from is a success.
- Teach:
1. Immediate Actions:
Lower the nose to select glide attitude.
Select a landing area (Ideally within 30° of the nose). Do NOT try to turn back – danger of stall/spin.
Plan and fly the approach (Use of flap, S-turns to control the approach.) Stress that it’s much better to run into a fence/wall at 10 kts on the over-run, that at 65 kts, in the under-shoot)
2. Subsequent Actions.
Only if time permits. Stress that it’s infinitely better to land safely with NO checks done than to compromise the approach by concentrating on checks:
Engine Fire/Failure/Crash Checks. From memory – touch drills only for practices
RT: “MAYDAY” call
Before his first solo, make sure you have, at least, pointed out suitable landing areas to your student should the worst happen but beware of over- stating the risks!
COMMON FAULTS
- Many students forget that the wind at height is stronger and veered, compared to that at ground level and so fail to allow for drift correctly on the various legs of the circuit. Unless local regulations allow no room for error, accept minor errors in tracking initially, until the basic pattern has been learned.
- On EFATOs, many students are slow to lower the nose when the engine fails and tend to give undue priority to checks. Stress: Aviate (establish and maintain best glide IAS), Navigate (pick a field, plan the approach, then fly it), Communicate/ checks (only once a landing is assured).