Exercise 19 part A. Introduction to Instrument Flying – Full Panel
Introduction to Instrument Flying – Full Panel: AIR EXERCISE
1. INSTRUMENT APPRECIATION
- No screens
- Compare AI indications with visual attitudes
- Direct correlations in pitch and bank
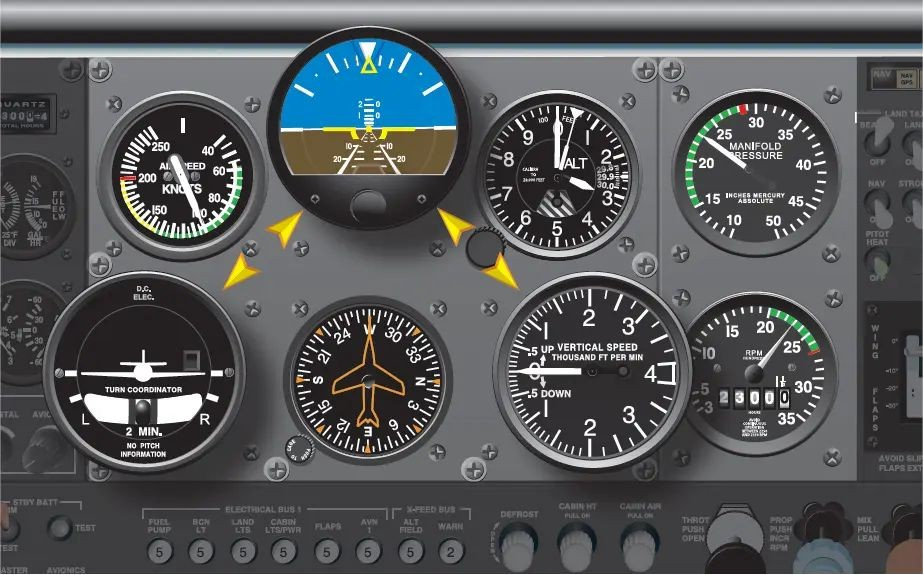
- No yaw indications – need to use ball (on conventional instruments) or trapezoid (on Garmin 1000) together with DI
- Typical attitudes for S&L, climb, descent, medium turns
2. SPATIAL DISORIENTATION
- Student’s eyes closed
- Maneuvers – student calls out perceived attitude
- When perception and reality differ,
- Student opens eyes
- Stress agreement between instruments and visual picture but difference from perception
- BELIEVE THE INSTRUMENTS
3. SELECTIVE RADIAL SCAN
- Set power
- Select, hold attitude (AI)
- Allow aeroplane to settle, trim
- Radial Scan of performance instruments, in turn Maintain/adjust attitude A/R
- Later – selective scanning of most important performance instruments
Stress:
Keeping attitude changes small; continuous scan, avoid fixation on one instrument
4. USING SELECTIVE RADIAL SCAN
- Regaining straight and level from minor pitch and bank errors
- Maintaining straight and level at specified datums
- Climbing, descending, level turns Climbing and descending turns
INTRODUCTION TO INSTRUMENT FLYING – FULL PANEL: AMPLIFYING NOTES
GENERAL
- Because of the large scope of the instrument flying syllabus, it is divided into two sections. This part deals purely with basic (full panel) of instrument flying; the next part covers Limited Panel flying.
- Instrument flying is a natural development of general flying training and you must stress that the basic technique of Power, Attitude, Trim is common to both visual and instrument flying. Instrument flying is not a completely different method of flying. Indeed, the principal difference between instrument and visual flying is that the attitude is now selected, adjusted and maintained using the Attitude Indicator or Artificial Horizon instead of the visual horizon. Your student will already have been using several flight instruments when flying visually as part of the Lookout, Attitude, Instruments work-cycle and using the information from them to decide whether an attitude change is needed – and if so, what. Consequently, you can, and should, build on that experience.
- In many ways, basic instrument flying should be less demanding than visual flying as 90% of your student’s workload (lookout) has been removed. The only difficult aspect is acquiring a disciplined, reliable instrument scan, which can only be acquired gradually. So do not rush your instruction but, as with the early visual exercises, make sure you teach thoroughly and that your student has mastered the basic techniques before you move on. This is particularly important when training a student on an aircraft equipped with a glass cockpit; it is easier to take in information on a glass cockpit without using a correct scan, and this means that the glass cockpit can hide the fact that the student has a poor technique. This often causes the student problems later on, when the workload increases, or perhaps when they need to use conventional instruments later in their flying career.
BEFORE FLIGHT
- Preparatory Instruction
a. Instruments:
1. Control and Performance relationships. Importance of balance
2. Indications and interpretation
3. Limitations and errors - b. Method and rates of scan.
c. Physiological considerations.
THREAT AND ERROR MANAGEMENT
1. Instrument checks and limitations
2. Instrument Flight Rules (IFR)
3. Altitude Separation System (Semi-circular)
4. Controlled airspace
5. Communications failure procedures
DURING FLIGHT
- Instrument appreciation
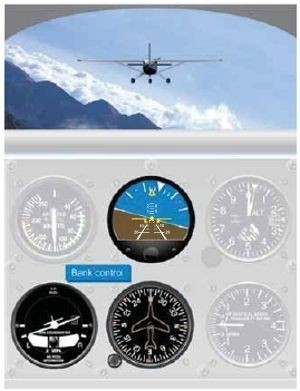
Fly the first instrument flying lesson without screens in order to compare instrument indications, particularly the Attitude Indicator, with the visual attitudes your student is already familiar with. Show that the Attitude Indicates pitch and bank but not yaw, so the ball must be used to check for balance. At this stage, demonstrate spatial disorientation; with his eyes closed either get your student to maintain a level 30° AOB turn or you fly a series of gentle maneuvers with him commentating on that attitude he thinks the aeroplane is in. When his perceptions and reality diverge, get him to open his eyes and show that the instrument indications tally with the visual picture. In other words, the instrument indications are true and his sensations were wrong so that he must ALWAYS trust his instruments rather than physical sensations. On subsequent lessons, use the screens/hood to deny your student the use of any external references.
- Selective radial scan
If technique is based on “Selective Radial Scan”.
Teach:
1. Set the appropriate power for the phase of flight or manoeuvre (e.g. straight and level, climb etc.). Confirm with RPM gauge – a “Control Instrument”.
2. Select and hold the appropriate datum attitude on the Attitude Indicator – the second “Control Instrument”. Allow the aeroplane to settle, then trim.
3. Scan the other flight instruments – “Performance Instruments” – in turn. Look at any instrument just long enough to gain the required information, then look back to the Attitude Indicator, either to hold or adjust the attitude. For example, if trying to fly Straight and level, check the altimeter – if it’s not moving the aeroplane is level, look back to the Attitude Indicator and maintain the pitch attitude. If the altimeter shows a climb or descent, look back to the Attitude Indicator and make a small pitch adjustment. Allow the aeroplane to settle, then trim. Teach your student not merely to pitch up or down but to decide what change they need to make and then select and hold a specific attitude. However, while the aeroplane is settling in pitch, teach your student to use this time to check another performance instrument e.g. the compass and /or Directional Indicator and then look back to the Attitude Indicator to either maintain wings level (if on heading) or to apply a little bank to correct any heading error. This is the “Radial” element of the scan. By teaching this technique thoroughly, your student will not fall into the trap of “chasing the performance instruments” and will have a sound basis for the more demanding tasks of procedural instrument flying.
4. Stress the need to scan the ball regularly to ensure the aeroplane is in balance and to trim the rudder.
5. Initially, teach your student to use the altimeter as the primary pitch performance instrument rather than the VSI. Later, you can teach using the VSI to back up altimeter information.
6. Emphasize that the relative importance of the performance instruments varies with maneuvre. For example, in a sustained climb, your student needs to check the ASI and Directional Indicator more often than the altimeter. By teaching the two or three performance instruments, in addition to the Attitude Indicator, necessary for each maneuvre you can reduce your student’s workload – freeing up capacity for other tasks. This is the “Selective” part of the scan technique.
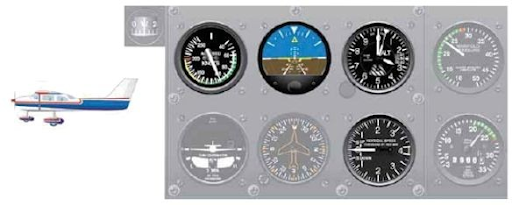
STRAIGHT AND LEVEL SCAN G1000/ANALOG INSTRUMENTATION
- Master Instrument – attitude indicator (always at the centr of the scan)
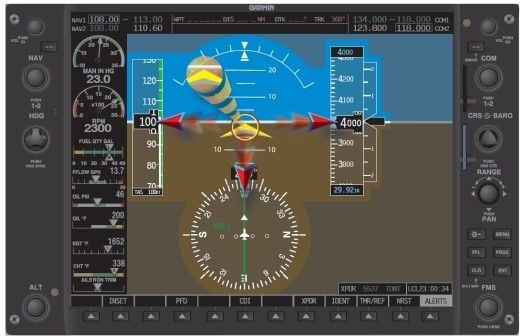
- Primary Performance Instruments:
○ Altimeter
○ Direction Indicator - Secondary Performance Instruments:
○ Other instruments as required
Pitch instruments:
Performance instruments:

CLIMBING AND DESCENDING SCAN G1000/ANALOG INSTRUMENTATION
● Master Instrument – attitude indicator (always at the centre of the scan)
- Primary Performance Instruments:
○ Airspeed Indicator
○ Direction Indicator - Secondary Performance Instruments:
○ Altimeter (gradually replaces Airspeed Indicator once established in the climb/descent and approaching target level)
○ Other instruments as required
Climbing and descending scan
TURNING SCAN G1000/ANALOG INSTRUMENTATION
Note that turns on instruments are generally Rate 1 turns, meaning 3°/second. A rough formula for the angle of bank to achieve rate 1 is:
Angle of Bank = Indicated airspeed / 10 + 7°
In practice, this results in an angle of bank of approximately 20° in light twin engined aircraft, and approximately 17° in single-engined aircraft. The Rate-of-Turn Indicator should then be used to confirm that the angle of bank selected is achieving a rate 1 turn.
● Master Instrument – attitude indicator (always at the centre of the scan)
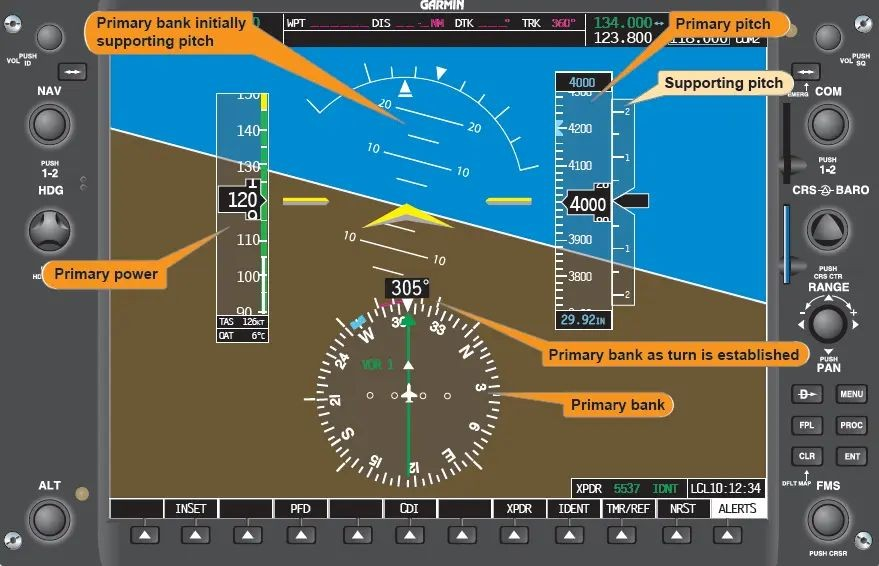
- Primary Performance Instruments:
○ Altimeter
○ Rate-of-Turn Indicator - Secondary Performance Instruments:
○ Direction Indicator (gradually replaces Rate-of-Turn Indicator once established in the turn and approaching target heading)
○ Other instruments as required
Instruments bank controlled
COMMON FAULTS
- Most of the faults listed below result from the student not applying the basic techniques outlined above:
1. Insufficient reference to control instruments
This usually shows an incorrect or inconsistent attitude on the Attitude indicator or incorrect power setting. It is often accompanied by over-controlling and needle chasing. Do not allow this failure in basic technique to develop – insist on your student selecting and holding specific attitudes.
2. Too much attention to attitude indicator/artificial horizon
If the performance instruments are not used to support the Attitude indicator, a small attitude error can cause a large error to develop slowly. For example, a small pitch error could result in a significant altitude error if the altimeter is not scanned.
3. Becoming engrossed in one instrument
Probably the most common error, it can be identified in one of two ways. First it can show as an error in one of the other planes; if your student becomes engrossed with the ASI he may allow a turn to develop. Second, it may show in the form of needle chasing. Stress the need to fly attitudes.
4. Scanning too slowly
Errors develop before any corrections are made; this is often accompanied by over-controlling. If large attitude adjustments have to be made, the scan is too slow. Stress looking at performance instruments no longer that necessary to get the required information, then continue scanning.
5. Superficial scan
If the scan is too fast, correct information cannot be obtained from the instruments. This often shows as haphazard changes in attitude or control movements. When using a glass cockpit, be aware that it may be more difficult to spot this error, because it is easier to obtain information. But if it is not spotted and corrected early on, it can cause problems later.
6. Poor balance
If the aircraft is not in balance, the heading is likely to wander even if the wings are level.
If you suspect any of these problems, get your student to call out each instrument as he scans it. In this way, you can check his scan pattern and rate and can check that he is correlating the information correctly.
7. Control technique
a. Trim-chasing is a common error, caused by the student either guessing the amount rather than relieving the pressure or trimming before the aeroplane has settled. Stress – Select, Hold, Trim. Emphasize that trimming correctly is a key to success and reduces the workload in flying accurately.
b. Excessive Control Movements can be made in two ways. First if the control is deflected for too long, it results in the aeroplane hunting around an attitude. Secondly, if the control deflection is too large, corrections are rapid and finish with a jerk. Stress – decide on a specific attitude and select it, smoothly.
c. Throttle errors can be caused either by not knowing the required setting (ask your student to confirm) or omitting the power instruments from the scan. Stress – decide on a specific power, set it, confirm.