Exercise 13 – The Circuit: Approach and Landing
APPROACH AND LANDING: AIR EXERCISE
NORMAL POWERED APPROACH
1. COMPLETE CIRCUIT
- (Follow-on from Exercise 12)
- Where to turn Base and Final
- Judging runway aspect – low/normal/high
- Go-around
- Checks, RT
2. BASE LEG
- Configure, descend at 70 kts
- Tracking
- ROD control
- Turning final
3. FINAL
- Full flap, descend 60 kts
- Tracking centerline – Crab method
- Descent path/ IAS control – Approach Path, Attitude, Airspeed, Power (A.A.A.P)
- Taper IAS to threshold speed
4.LANDING
- Flare – Start height,
- Landing attitude
- Gently lowering nose wheel
- Maintaining center line
- Braking technique
5. MISHANDLED LANDING
- Full power + select initial climb attitude
- Wings level
- Select flap 20
- Safe height and speed – select to 10 and than flaps up, when in positive rate, and no obstacles ahead
- RT call
6. TOUCH AND GO
- Normal landing – lower nose wheel
- Maintain centr line
- Trim for take-off
- Carb heat off
- Flaps 0/10°
- Full power
- Continue with normal take-off
7. GO-AROUND
- (Stress similarity to incipient stall recovery)
- Full power + select initial climb attitude
- Wings level
- Select flap 20
- Safe height and speed – select flap 10 than flaps up, when in positive rate, and no obstacles ahead
- RT call
GLIDE APPROACH
1. GLIDE CIRCUIT
- Same as normal powered approach (NPA) until late downwind
- Initial Aiming Point (IAP)
- Maintain 60 kts glide right to start of flare
- Final – closer in + steeper approach path
- Low nose attitude with flap
- Flare – more anticipation, two stages
2. “STRETCHING THE GLIDE”
- (Demo outside the circuit)
- From 60 kts, full flap glide – show impact point
- Reduce to 55 kts – looks better initially, then undershooting impact point
3. GLIDE APPROACH
- Nominate Initial Aiming Point (IAP)
- Where to turn Base Leg
- Where to close throttle
- Maintain 60 kts glide (Attitude controls airspeed)
- Judgement of descent on Base Leg
- High – S-turn, flap
- Low – Cut corner
- Flap to move from IAP to touchdown point
- Very low nose attitude with full flap – never select below 200 ft aal)
- Flare – more anticipation, two stages
- Landing – same as normal power approach (NPA)
- Note: High and Low key.
Stress never stretch the glide, or continue very high approaches: GO-AROUND!
FLAPLESS
1. FLAPLESS
- (Compare with NPA)
- Same as NPA until late downwind
- Extend downwind
- Aspect – longer, flatter approach at 65-70 kts
- Higher nose attitude
- Very little flare
- “Floating” more likely
2. FLAPLESS
- Where to turn Base Leg
- Descend (clean) at 65-70 kts – lower datum power
- Aspect for flapless approach
- Low drag – small power changes
- Taper IAS to threshold by start of flare
- Small attitude change to flare
- If floating is prolonged – Go-around
- Longer ground run
CROSSWIND
1. CROSSWIND APPROACH
Tracking center line: “crab” technique – wings level, apply drift, gentle, coordinated turns to regain Change of drift down final Approach path control – standard (for type of approach) No increase in approach speed
2. CROSSWIND LANDING
- Maintain drift until flare complete
- Rudder to align with runway – aileron for wings level
- Control weathercock tendency
- Into-wind aileron
In the event of prolonged float – go around to prevent sideways touchdown
PERFORMANCE LANDING
1.PERFORMANCE LANDING
- Standard normal approach power (nominating touchdown point) up to and including landing.
- With nose wheel on the runway, raise flap fully
- Maximum braking – normal braking for practices
THE CIRCUIT: AMPLIFYING NOTES
APPROACH AND LANDING
GENERAL
- Before his first circuit lesson, your student will have learned almost all the basic flying skills needed to fly the latter part of the circuit, so this exercise is essentially about applying those skills in the busy environment of the circuit. One of your main tasks, initially, is to protect the student from overload by concentrating on the essential application of flying skills and introducing checks and RT only when you judge the student can cope with them. Stick to basic principles: Aviate; Navigate; Communicate/ Checks.
- To do this, you should get the student to fly parts of the circuit in return from the basic lessons, as soon as he has learned each skill. For example, he should fly the latter part of the downwind leg on return from the Straight and Level exercise. You must not fly any part of the recovery that your student can fly himself, either “to save time” or for your own benefit.
- In addition, by following procedures to teach approach configuration stalls from a simulated circuit, you will ensure that your student will be familiar with, and will have practiced, downwind and base leg procedures and descending in the approach configuration at medium level, just before his first circuit lesson. Finally, you can apply the lessons from the recovery from an approaching stall on final to the go-around, as the two are almost identical.
- Before the first solo flight, the student should be able to make Normal Powered Approaches (NPA) and landings competently. He should also be able to make safe glide approaches, in the event of an engine failure.
BEFORE FLIGHT
● Preparatory Instruction
- Circuit, approach and landing
- Effect of wind (including crosswind, gusts)
- Going-around
- Use of nose wheel steering and brakes
- Consideration for short landings
- Airfield control and RT procedures
- Lookout and listen out
- Wake turbulence
THREAT AND ERROR MANAGEMENT
1. Lookout/Listen Out
In the congested environment of the circuit, good lookout is essential for safety, so you must demand a high standard from your student. In addition, teach him to listen to others’ RT calls to aid Situational Awareness which helps to locate other traffic.
2. Checks
Help your student by doing some or all of the landing checks initially, gradually passing responsibility to him to do them from memory before first solo.
3. RT Procedure
Teach RT procedures progressively and, if necessary, do the RT for your student on the first lesson. Insist on correct phraseology and procedures, concise transmissions and on calls being made in the right places (early or late calls cause confusion). By first solo the student must be completely familiar with the circuit RT procedures and the action in the event of a radio failure.
4. Adherence to Procedures
Ensure your student is aware that the circuit rules may be broken at the pilot’s discretion in an emergency, but due regard must be given to the risk of collision and ATC informed of any departure from normal procedure. In addition, stress the dangers of over-banking and that more than 30° should not be used, except in emergencies.
5. Wake Turbulence
Discuss the hazards associated with wake turbulence and the separation recommended in the current regulations.
DURING FLIGHT
- Joining the circuit
Teach your student to complete the Airfield Approach Checks in good time and stress the importance of good lookout at all times and the need to locate all the other aircraft in the circuit. Show him how the RT calls of other aircraft can provide guidance on where to look, but point out that he must not rely solely on these calls. Point out that the areas where collision risk is greatest: when joining the downwind leg where traffic may already be in the circuit, on base leg with traffic joining on the opposite base, and on the final turn if there is traffic on a straight in approach.
DOWNWIND LEG
Teach when to make the turn onto base leg, (based on 1 to 2 chord lengths beyond the runway threshold for a normal power approach with a 10 knot headwind on final.) Later, teach when to make the RT call – not before abeam the upwind threshold and to call “Late Downwind” if the call cannot be made in the right place. Encourage your student to complete the Landing Checks at the beginning of the downwind leg so that he can devote full attention to correct tracking.
BASE LEG
Teach applying drift to maintain a track at 90° to the runway direction and continually to re-assess the aircraft’s track. Configure and set power to descend to about 500 ft aal by the start of the final turn. Teach continual assessment of the descent path and power adjustments, as required, to start the final turn at correct altitude. Remember that starting the final turn at the right altitude is essential in order to roll out at the right height, so that the start of final approach is consistent and your student has a realistic chance of learning to fly safe, accurate, stable approaches. Teach him to look out for aircraft that may be making a long final approach (e.g. instrument traffic), and/or other traffic joining on the opposite base.
FINAL TURN
This is essentially a descending medium turn. Teach when to start the turn and how to vary the angle of bank (up to 30°) to roll out on the runway extended centrline whilst maintaining the correct IAS. Stress the dangers of over- banking and that if more than 30° would be required, your student must accept flying through the centr-line to turn back on, IF THE FLY-THROUGH IS ONLY MINOR, otherwise – go-around.
Note: (tailwind on base leg) Some students trying to catch the runway centrline during the turn to final, the student is trying to decelerate with a nose up pitch tendency and at the same time applying bank more then 30° with aggressively applying a pedal in direction of turn with not checking the airspeed, it is a mental feeling of student which is trying to be precise in traffic pattern . Check for any symptoms of it in early stages of training.
FINAL: NORMAL POWERED APPROACH
1. Maintaining the centre line with small bank angle corrections – coordinated with rudder.
2. Once lined up on final approach make the “final” call, select full flap. Maintain attitude to reduce to the final approach speed of 60 kts. (This is the “datum attitude for a normal approach.)
3. How to assess the approach path in relation to the ideal one. Demonstrate the appearance of a low approach by rolling out low on final, maintain that approach briefly, regain the ideal descent path, maintain it briefly and then go high; maintain that briefly, then patter a go around. At each stage, show runway aspect and PAPI indications (as confirmation). Stress that your student should not try to “rescue” a very high or low approach but should go around and remember that the approach should be close to 3°. DO NOT TEACH USING STEEPER APPROACHES (“in case the engine fails”) – IT IS UNNECESSARY…
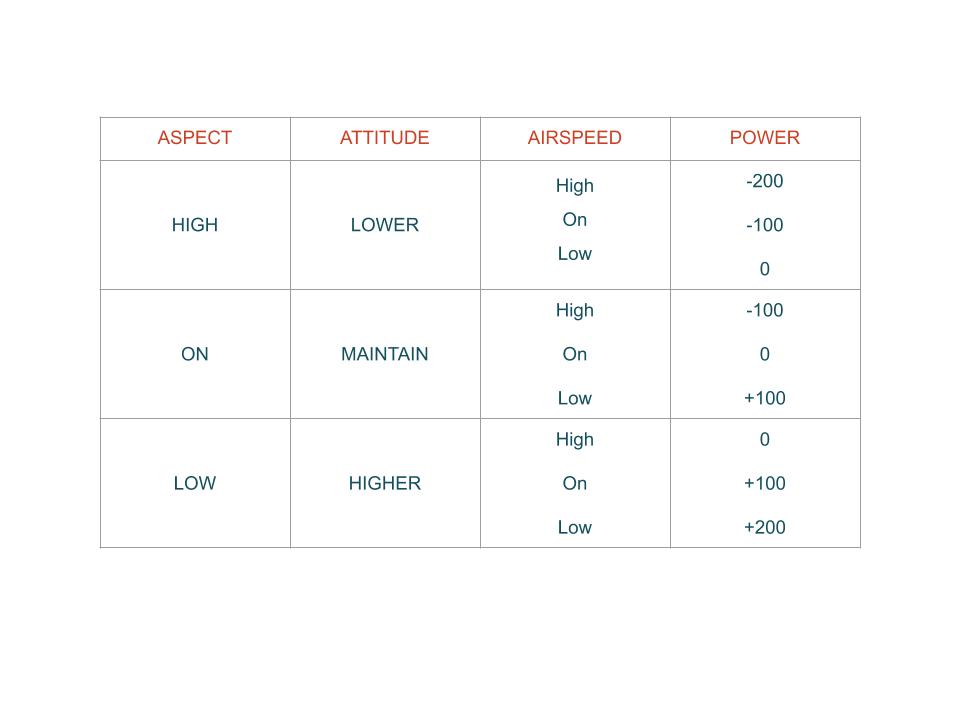
4. Then teach regaining /maintaining the correct approach path and IAS, using the Approach Path, Attitude, Airspeed, Power work-cycle below (pointing out that this is just a modification of the familiar Lookout, Attitude, Instruments process).
- Approach path (runway Aspect) – Assess (high, correct, low?)
- Attitude – Adjust as necessary (if high lower the nose; on the correct path: maintain attitude; if low raise the nose). Teach how to use standard (small) pitch changes (± 3°) and maintaining new attitude until back on correct path, then re-selecting “datum”
- Airspeed – Check ASI
- Power – Adjust as necessary. Use standard power changes (± 100 RPM for 5 kts speed error)
Because changing attitude will affect IAS, you should help the student by giving “rules of thumb”. Using the matrix below will help your student practically and also give them an understanding of the important concept of “energy management”.
(When appropriate, show that runway aspect will vary depending on the runway dimensions as well as the glide-path angle, and that sloping runways and undershoot areas can also cause illusions. Teaching your student to start final at the correct height and distance will enable him will ensure that he starts the final approach at a suitable approach angle and can aim to maintain/regain it. However, fine judgement is required and he may need a lot of practice to get things right.)
5. Emphasize that a stable approach is a prerequisite for a good, safe landing. Stress the importance of meeting the “Commit Criteria”: ATC clearance to land; clear runway, and, in particular, a stable approach. Unless all criteria are met the student MUST go around by 200 ft aal.
NORMAL POWERED APPROACH LANDING
Stress that the landing is not complete until the aeroplane is clear of the runway and stopped with parking brake ON (if available) for the After Landing Checks.
1. Starting about 200 ft above the threshold, the IAS should be tapered to threshold speed using small power reductions (maintaining attitude).
2. Teach how to judge the height to start the flare, using the appearance and granularity of the touchdown area, but avoiding fixation on the aiming point.
3. The flare is a gentle pitch up maneuver to select the landing attitude coupled with smoothly closing the throttle fully. This will result in a very low ROD and the aircraft settling on the main wheels some 5-10 knots below threshold speed – provided the flare was started at the right height and speed. Several important factors to bear in mind when teaching the landing are:
a. You must teach your student to select and hold the correct landing attitude (which in our aeroplanes is constant and very similar to the initial lift-off attitude) by looking well ahead at the far end of the runway. If necessary, demo the attitude by holding the aeroplane on the runway as part of a touch and go or on the first part of the landing roll (using a little power for elevator control). Stress lowering the nose wheel gently and maintaining directional control (on the centrline) with nose wheel steering.
b. The brakes should not be applied until all three wheels are firmly on the ground, the first application being gentle and the pressure increased as necessary to bring the aircraft to a safe taxi speed before reaching the turn-off point. Stress the dangers of turning off the runway at excessive speeds and of the strain that is imposed on the landing gear by fast cornering. The aircraft should be stopped when well clear of the runway, the parking brake applied and the after landing checks carried out.
c. Trying to land at too high a speed is potentially dangerous: the aeroplane is very likely to balloon, bounce or porpoise or the student may try to force the aeroplane down and land nose wheel first – all of which can result in serious damage. The risks of an over-run or excessive tire and brake wear also all increase. Teach that if the aeroplane balloons or bounces the student MUST apply full power, select the initial climb attitude and go around – there are no exceptions to this rule!
d. There is no need to increase approach speed in turbulence or a crosswind so we are trying to keep standard speeds according to POH. Any knots added must be reduced before starting the flare, (increasing the student’s workload unnecessarily) otherwise the problems outlined in (c) above will occur.
TOUCH AND GO
Teach:
a. Carry out a normal landing, lower the nose wheel and regain/maintain the runway centr line.
b. Raise the flaps to 0/10°, confirm retraction, trim aircraft for take off, carb heat off and apply full power, continue as for a normal take-off.
GOING AROUND
Stress that electing to go around is never an admission of failure. Rather, it is good aviation practice to maintain safety margins if an approach or attempted landing is unsatisfactory.
Teach:
- That the go-around from final is virtually identical to the incipient stall recovery (except for the lack of stall warning and the subsequent panic!)
1. Apply full power (using rudder to balance).
2. Select initial climb attitude (wings level).
3. Retract flap to 20, then at a safe height and speed (200 ft agl and at least 60 kts) retract flaps fully.
4. At 67-70 kts, climb away normally, in accordance with local ATC procedures.
5. Once settled in the climb, advise ATC - It may be necessary to go around from base leg, if instructed by ATC or if separation from an aeroplane ahead is degraded. The procedure is similar to that above, except that only partial flaps will be selected. As before, confirm “safe height and speed” before retracting flaps, advise ATC and either follow the circuit pattern or proceed as ATC directs.
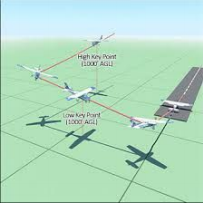
GLIDE CIRCUIT
- The glide circuit is used to improve your student’s skill and judgement which will be exploited in the latter stages of a forced landing. The circuit should be flown at the same altitude and at the same spacing as for a normal powered approach. However, the turn onto base leg should be commenced one chord length earlier and should be based not on the runway threshold but on an initial aiming point (IAP) about 200 metres in from the threshold. The IAP should be selected to be some easily recognizable feature (PAPI installation, runway intersection, etc.) and is the point at which the aircraft would impact the runway if full flap were not used and the aircraft was not flared for landing.
Teach:
1. Turn onto the base leg, maintain attitude.
2. Close throttle when sure of reaching the IAP, gliding clean. (When the IAP is at 45° from the nose or inside an imaginary semicircle through the nose of the aeroplane).
3. Maintain attitude initially, then establish a 75 kts glide. Emphasize strongly that, unlike the NPA, attitude MUST be used to maintain IAS at 60 kts.
4. Monitor descent profile (if the IAP moves up the windscreen, the aeroplane is going low, if it moves down there is height to spare – usually a good thing). If starting to go low, teach turning towards the AIP (cutting the corner onto final). If going high, teach using S-turns to restore position of AIP in the windscreen.
5. When established on final, teach selection of flap in stages to bring back the landing point from the AIP towards the threshold. Stress the following points:
a. The lower nose attitude required to maintain 60 kts as each stage of flap is lowered, with reduction in gliding range.
b. The very steep nose-down attitude with full flap selected and that, consequently, full flap must never be selected below 200 ft aal. (Either accept landing a bit long, with partial flap – runway length permitting – or, better still, go around and learn from the mistake.)
c. It is impossible to judge the gliding performance unless the IAS is correct.
d. The dangers and futility of trying to “stretch the glide”. Not only are safety margins eroded but performance is actually degraded. Outside the circuit, get the student to set up a glide with full flap, pick a feature where the aeroplane would impact the ground and then demonstrate that if the nose is raised the aiming point moves down the windscreen, initially but with the IAS stabilized at 65 kts the impact point moves back up the windscreen and the new impact point is short of the original one.
6. Best glide IAS is maintained all the way to the start of the flare.
7. Greater anticipation is required (about 50 ft more) to begin the flare.
8. A two stage flare, first to a level attitude, then to select the landing attitude (the same attitude as the NPA).
FLAPLESS LANDING
- This landing might be needed in the unlikely event of flap malfunctions and practicing it also increases the student’s experience of alternative landing patterns. Because of the reduced drag on the approach, it is good to extend the downwind leg to produce the shallower final approach angle (to avoid very low datum power settings which would make speed control problematic). Using normal powered approach as a base-line, teach the similarities and differences:
1. The circuit is identical to the normal powered approach as far as downwind.
2. Extend the downwind leg by one more chord-length.
3. On base leg, reduce power to ± 1400 RPM, descend (clean at 65 kts)
4. Start the final turn at the same altitude as for the normal powered approach.
5. The runway aspect is flatter – but beware of excessively low approaches: four red PAPIs is too low!
6. The approach speed is now 65 kts (to maintain a safe margin above the stall).
7. The datum descent attitude is higher than on a normal powered approach
8. The “Point and Power” technique used for the normal powered approach is also used when flapless but, because of the reduced drag, power adjustments (particularly increases) must be kept small. Stress that if the throttle has to be closed completely to control the speed, the approach has been misjudged and your student should go-around.
9. It is even more important to reduce from approach to threshold speed by the start of the flare because of the lower drag during the flare itself.
10. The attitude change at the flare is small, there is a greater tendency to “float” and the landing run will be longer. Stress that if float is prolonged, the student should initiate a go-around.
CROSSWIND LANDING
- Your student may be faced with a crosswind landing from any type of approach (normal powered approach, glide etc.) The technique to fly the circuit and final approach (including drift allowances to keep the circuit square) is the same as when there is no wind across the runway. Teach your student to check the windsock before take-off and when joining the circuit, and to listen to any wind reports from ATC in order to make the appropriate allowances in good time. Remind your student that the wind at circuit height is different from that at the surface and so the drift needed to track the centrline on final will change during the approach. Of the three methods to maintain the centrline on final (side slip, crab, or combination of it), crab approach is a main technique.
- Note: refer to Flying Academy maneuvering handbook chapter 4
So teach:
1. On base leg there will be either more or less time to lose the necessary height before the final turn. Anticipate this and set power accordingly, to start the final turn at the correct altitude.
2. Anticipate the effect of crosswind on the final turn (tightening or widening) and begin the turn accordingly.
3. Roll out on final, apply and modify drift in order to track the centrline, using gentle, coordinated turns to regain the centrline.
4. Maintain the drift until the flare is completed, then use rudder to align the aeroplane with the runway, using aileron as required to maintain the wings level. (Point out that this has the beneficial effect of giving into-wind aileron after landing to oppose any tendency for the upwind wing to lift.)
If the aeroplane floats after the flare, it will begin to drift sideways, touching down with a side-load on the landing gear. The best safe-guard against floating is to fly an accurate approach, achieve the correct threshold speed and to use full flap. Do NOT teach to increase approach speed with a crosswind, nor landing with partial flap.
PERFORMANCE LANDING
The aim of the performance landing is to achieve minimum ground run. The circuit, approach and touchdown are identical to that for the normal powered approach. As your students gain experience, you should teach them to nominate a touchdown point and try to achieve it. The only differences to the normal powered approach are after touchdown, so teach:
1. Starting steady continuous braking as soon as all three wheels are on the ground. Although, in practice, to avoid excessive wear on aircraft components, teach using normal braking.
2. Raising flap fully, without delay (to increase the weight on the wheels to increase braking effectiveness).
ENGINE FAILURE IN THE CIRCUIT
Unlike the engine failure after take-off, consideration of engine failures in other parts of the circuit is often overlooked. Teach your student that any failure on crosswind before reaching circuit height should be treated as an engine failure after take-off, but once at circuit height it is possible to turn back safely to the airport. Whilst there is no reason not to land off-airport if there is a good landing area, point out that it is usually better to land back on the airport – not necessarily on a runway or into wind – because the surface is generally flat with few obstructions and the rescue services are already there.
COMMON FAULTS
- The most common causes of bad landings are:
1. Faulty approaches at too high or too low airspeed or on an unsuitable approach angle. Teach your student always to go around from a poor approach.
2. Erratic/bad judgement of the roundout height and poor control of direction during the roundout – usually caused by looking at the ground too close to the aircraft and becoming tense on the controls. Emphasize looking well ahead to judge and select the correct landing attitude.
3. Not keeping the wings level, especially when eliminating drift during a crosswind landing. Again, emphasize looking well ahead to judge and select the wings-level attitude.
4. “Ballooning” or floating during landing – invariably the result of not reducing to threshold speed. Emphasize the need for accurate speed control during the approach.
5. Flaring too high – sometimes caused by fear of getting too near the ground. This can often be cured by a clear demonstration of round out height by flying the aircraft along the runway in the appropriate attitude and at the roundout height.
- Until he has had practice, your student’s errors are likely to be of a random nature, so do not attempt to analyze his difficulties too quickly. After he has grasped the basics, any errors will normally form a consistent pattern which can easily be recognized and corrected. Re-demo as necessary – which will give your student a break. If you feel it necessary to “follow through” during your
student’s initial landings (to ensure safety), then brief him before the event but do not “ride” the controls having given the student control. Avoid too many consecutive touch and go landings or the student will lack practice in controlling the landing run.